How to Rewire a Golf Cart Battery
Rewiring the bank is straightforward if you photograph the layout first and work negative-off-first. Here is the safe, ordered procedure to replace your battery cables correctly.

- Set the tow/run switch to tow and disconnect the main negative cable first to prevent shorts, then the positive.
- Remove the old inter-battery jumpers and inspect them, replace any that are corroded, undersized, or have damaged lugs.
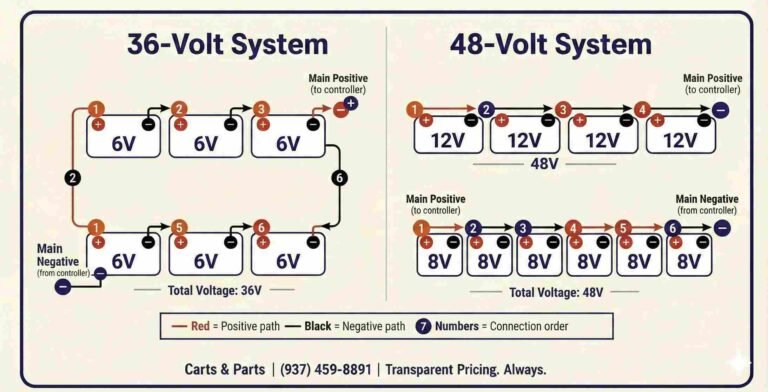
- Reconnect in series exactly as documented: each battery’s positive to the next battery’s negative, down the chain.
- Connect the main positive lead first, then the main negative last.
Whether you are replacing corroded cables or restoring a bank after a battery swap, rewiring is a job most owners can do with care and a meter. The key to learning how to rewire a golf cart battery bank is documenting the original series layout before you remove anything, then rebuilding it exactly.
Step 1: Disconnect and Document
Set the tow/run switch to tow and disconnect the main negative cable first to prevent shorts, then the positive. Before touching the jumpers, take clear photos of the series layout from several angles, this is your map for reassembly. Note which end carries the main positive and which the main negative.
Step 2: Remove Cables and Clean
Remove the old inter-battery jumpers and inspect them, replace any that are corroded, undersized, or have damaged lugs. Clean every terminal post with a brush until bright, and treat with anti-corrosion protectant. Corrosion here is a leading cause of common cart problems.
Step 3: Rewire a Golf Cart Battery in Series
Reconnect in series exactly as documented: each battery’s positive to the next battery’s negative, down the chain. Use properly sized cable (typically 6 AWG, see what wire to use) and torque each connection. Follow the series pattern in our battery wiring guide if unsure.
Step 4: Reconnect Mains and Verify
Connect the main positive lead first, then the main negative last. Before powering on, measure across the main terminals with a multimeter to confirm the correct total (about 38V for 36V, 50V for 48V). Only then set the switch to run and test.
Layouts Differ by Cart
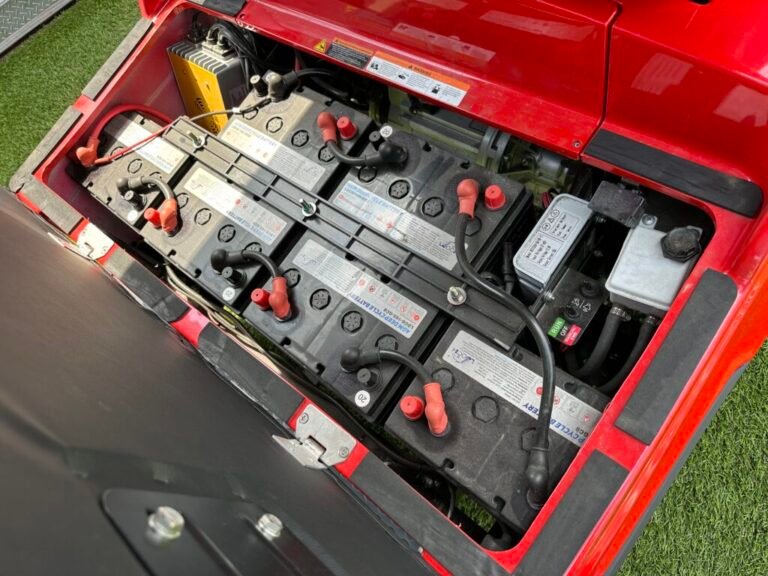
Not every bank is wired the same, so your photos matter more than any generic diagram. A 48V EZGO RXV (2008 and newer) runs four 12V batteries, while a 48V TXT runs six 8V batteries, and a 48V Club Car Precedent also runs six 8V units, all in series but with different jumper routing under a different tray. Yamaha Drive and Drive2 carts pack their batteries tightly with short factory jumpers that are easy to reinstall one position off. Because the physical arrangement varies, rebuilding to the original photo, not to a picture from another cart, is what keeps you from creating a dead short or a reversed battery.
Cable Gauge, Lugs, and Crimps
If you are replacing jumpers rather than reusing them, size the cable to the current. Stock 6 AWG is fine for a bone-stock cart, but if you have added a high-amp controller, step up to 4 AWG or 2 AWG welding cable so the pack is not the bottleneck. Just as important is how the lugs are attached: a proper hydraulic crimp, ideally with a dab of dielectric grease and adhesive-lined heat shrink over the barrel, outlasts a hammer crimp by years. A poorly crimped lug is invisible corrosion waiting to happen, and it is the number-one reason a freshly rewired bank develops a hot terminal within a season.
Safety Rules That Actually Matter
Battery banks store enormous short-circuit current, so treat every metal tool as a live risk. Remove rings and watches, use insulated wrenches, and never let a wrench bridge a positive post to the frame; that arc will weld the tool and can rupture a battery. Work negative-off first and negative-on last for exactly this reason, because it minimizes the window where a slipped tool can complete a circuit. Keep baking soda and water nearby for acid spills on flooded packs, and wear eye protection the entire time. These are not formalities; a 48V pack can deliver hundreds of amps into a dropped wrench instantly.
Once the pack is rebuilt and voltage-checked, torque each terminal to the battery makers spec rather than gorilla-tightening it, since over-torque cracks the post seal and invites the very corrosion you just cleaned away. Coat the finished connections, close the tray, and take a short test drive, then re-check every terminal for heat after that first run. A rewire done carefully like this will outlast the next set of batteries.
Rewiring a Lithium Bank Is Different
If your cart runs lithium blocks instead of six lead-acid batteries, the rules change. Many drop-in LiFePO4 packs are a single block or two blocks with their own internal BMS, so there is little inter-battery jumpering to do, but any series connection between lithium blocks must use blocks rated for series use, or the BMS units fight and shut the cart down under load. Never mix an old lead-acid main cable set that has hidden corrosion into a new lithium install; the pack delivers full current until nearly empty and will expose a marginal cable as a sudden cutout. When in doubt with lithium, follow the manufacturer wiring diagram exactly rather than the traditional six-battery pattern.
Final Verification Checklist
Before you call the job done, run through four confirmations: total pack voltage reads correct at the main terminals, every jumper is snug and torqued, no cable touches a sharp edge or the frame, and there is no reversed battery (each post connects positive-to-negative down the line). A five-minute meter check across each battery and the full pack catches a wiring mistake while it is still harmless. Skip it and the first mistake announces itself as a blown fuse, a smoked controller, or worse.
For the federal safety standards that govern these vehicles, see NHTSA low-speed vehicle standards.
Frequently Asked Questions
How do you rewire a golf cart battery bank?
Disconnect the main negative lead first, photograph the existing series layout, remove and replace the jumper cables, clean every terminal, reconnect positive-to-negative in series, then attach the main leads (negative last) and verify total voltage with a meter before powering on.
What order do you connect golf cart battery cables?
Disconnect the negative main first and reconnect it last to avoid shorts. When rebuilding, wire the batteries in series (each positive to the next negative), then connect the main positive lead, and finally the main negative.
Reviewed and updated July 7, 2026 by the Golf Cart Lab team.